
4. Getting Started
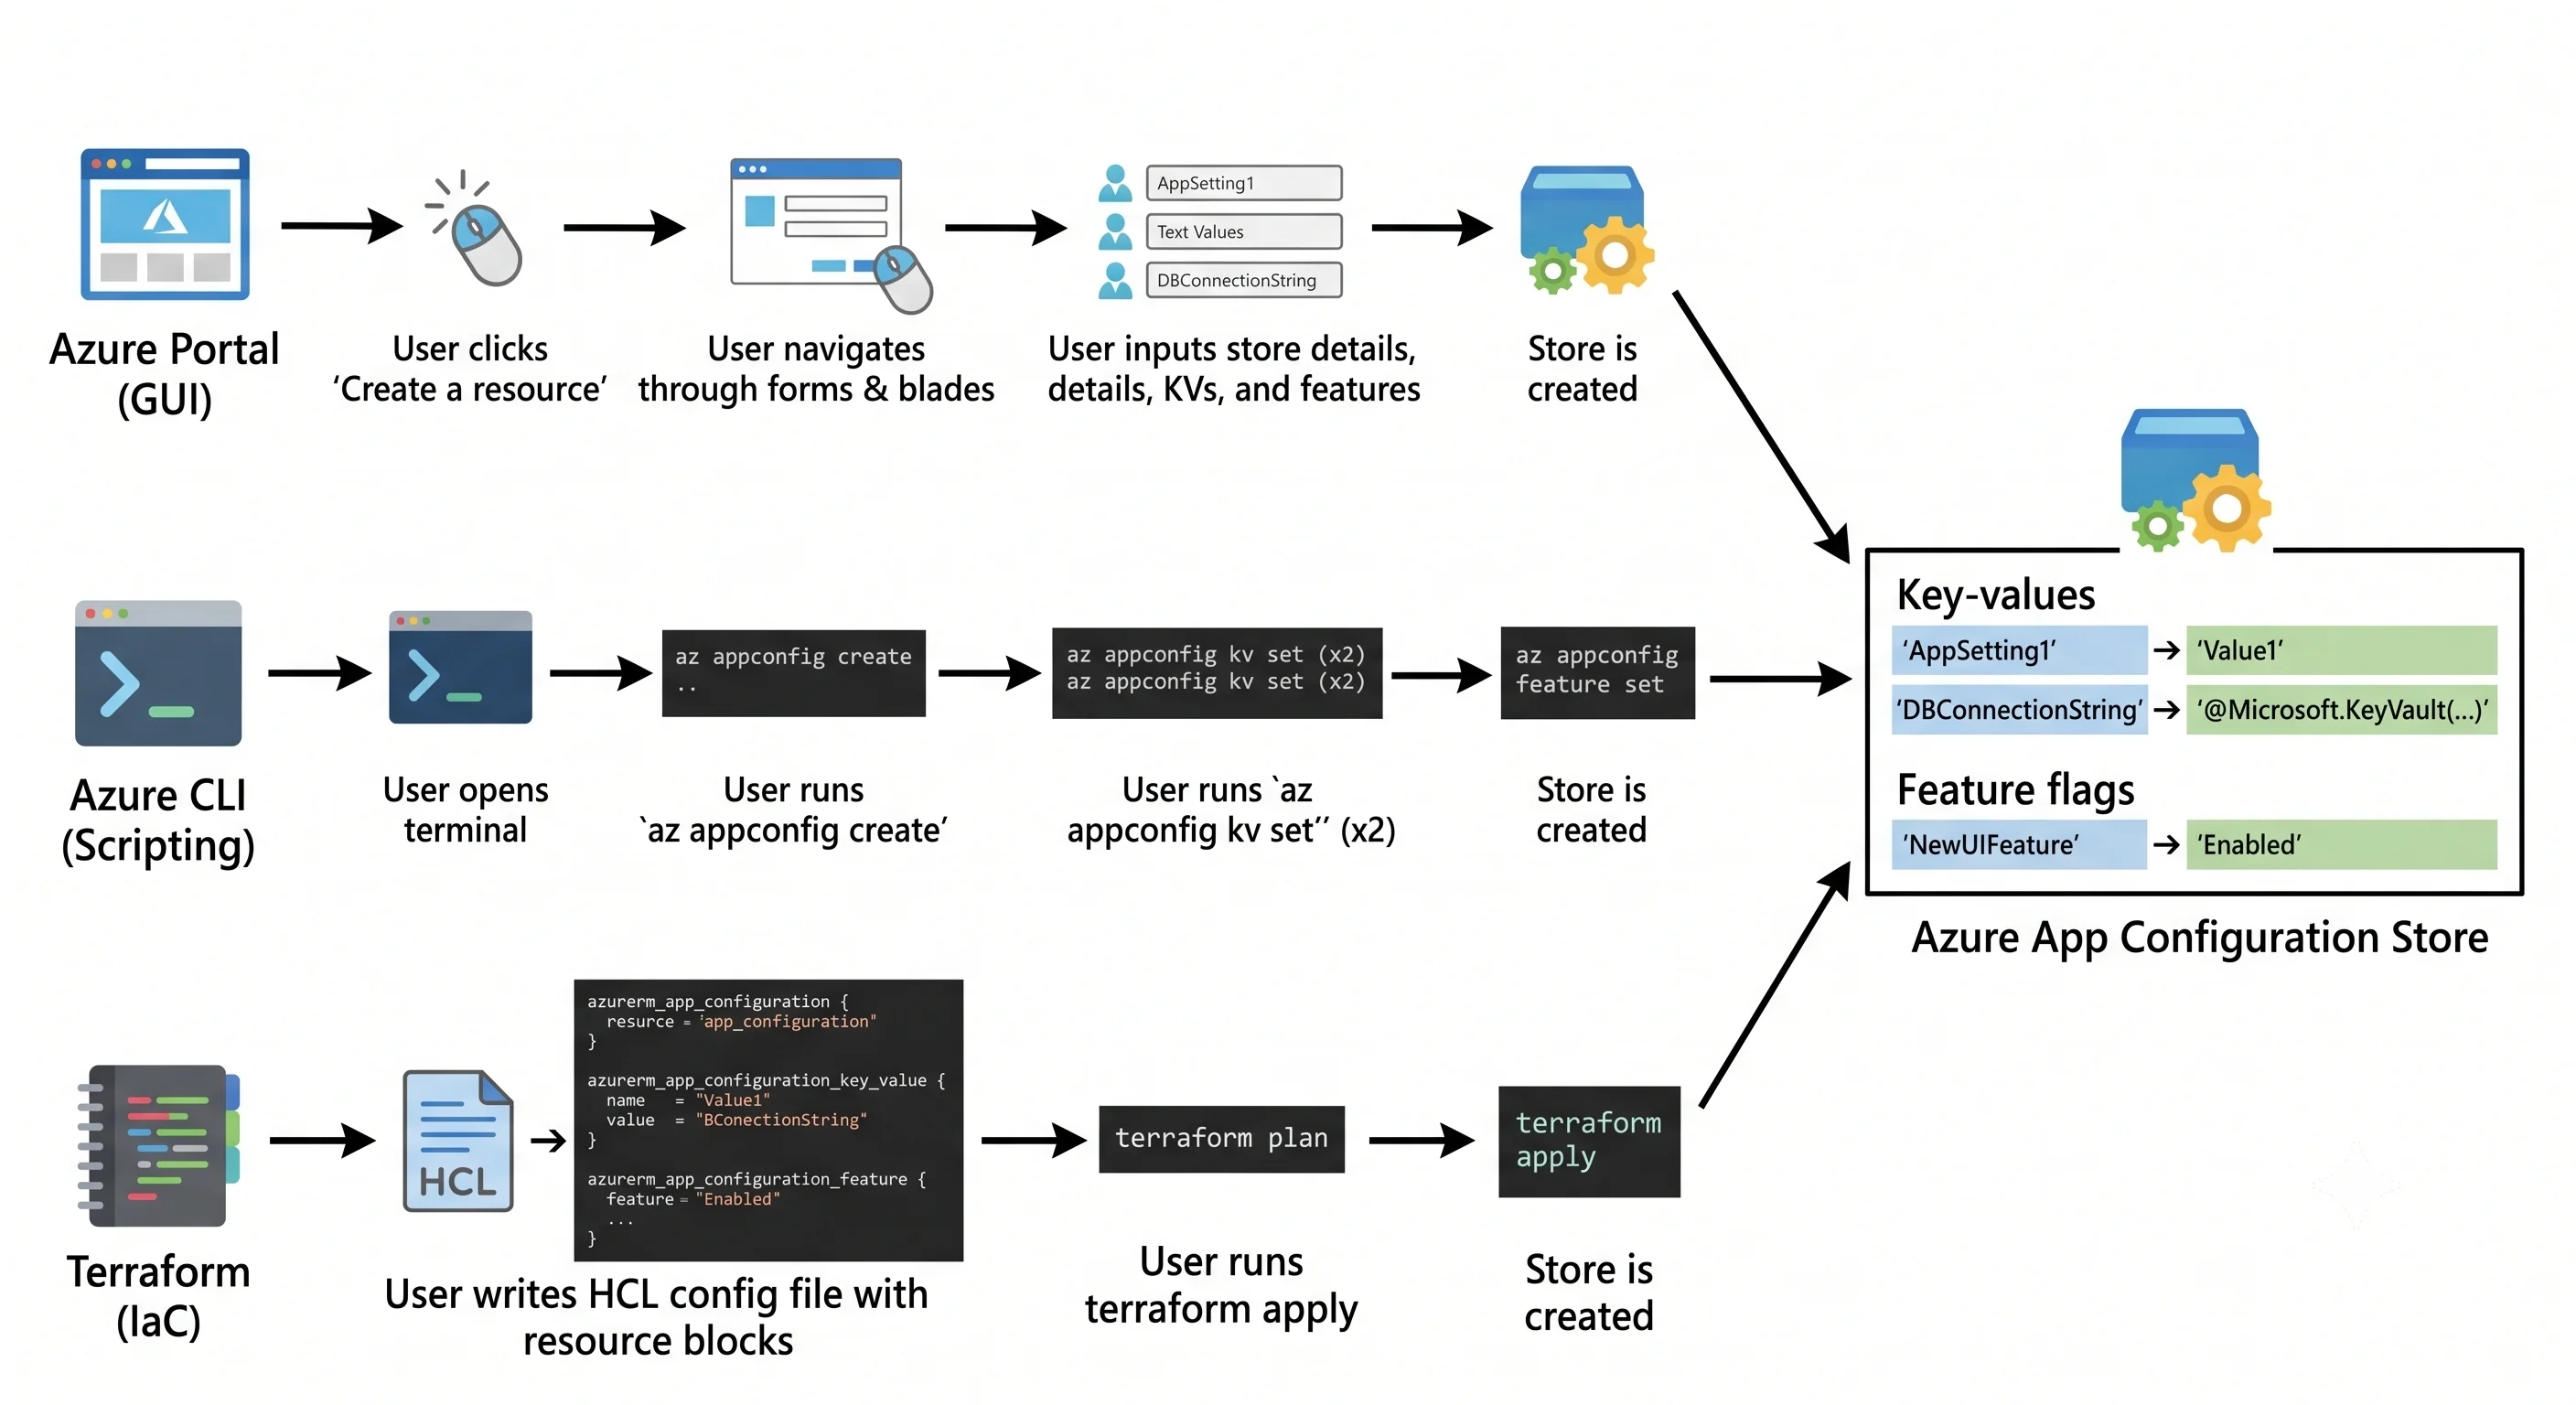
A minimal, runnable store — three ways, because interviews and real jobs use all three.
Scope discipline. Everything on this page is deliberately throwaway: hard-coded names, no variables, no remote state, no pipeline, Free tier, public network access. If a snippet here would embarrass you in a pull request, that's intentional — the production-shaped version lives in Deployment.
The task, the same in all three paths: create a store, put two key-values in it with different labels, add a feature flag, read it back.
Create a throwaway resource group first and delete that at the end. It's the cleanest teardown Azure gives you — one command removes every resource inside it — and it's a genuine advantage over AWS worth pointing out once.
Before you start
- An Azure subscription and either the portal or a logged-in CLI (
az login). - A data-plane role on yourself. This is the step people skip. Creating the store makes you Owner on the resource; it does not let you read or write key-values. Assign yourself App Configuration Data Owner — the command is in the CLI path below and it is the single most useful thing on this page.
- Store names are globally unique (they become a DNS label), so substitute your own suffix
everywhere you see
demo01below.
Path 1 — Azure Portal
The fast way to build intuition. Not repeatable, and the portal's navigation changes often, so this is kept short and blade-based rather than a chain of exact button labels.
- Create a resource → search "App Configuration" → Create. Pick your throwaway resource group, a region, a globally unique name, and the Free tier. Create.
- On the new resource, open the Access control (IAM) blade and assign yourself App Configuration Data Owner. Do this before anything else or the next blade will refuse you.
- Open the Configuration explorer blade → Create → Key-value. Add
Api:Timeout=30with no label, then create it again asApi:Timeout=60with labelprod. You now have two rows with the same key — which is the whole point, and worth pausing on. - Open the Feature manager blade → Create. Name it
Beta, leave it disabled, then enable it and add a percentage filter set to 50. Notice that the feature flag also appears in Configuration explorer as a key under.appconfig.featureflag/— the Feature manager is a view, not a separate store. - Open the Access settings blade to see the endpoint and the access keys. Note that the keys are visible to anyone with Contributor on the resource; that's the plane leak described in Architecture.
Path 2 — Azure CLI
Copy-pasteable, repeatable, and the version to actually learn.
# --- variables -------------------------------------------------------------
RG=rg-appconfig-demo
LOC=uksouth
STORE=appcs-demo01          # must be globally unique — change the suffix

# --- create the resource group and the store -------------------------------
az group create -n $RG -l $LOC

az appconfig create \
  -n $STORE -g $RG -l $LOC \
  --sku Free

# --- grant YOURSELF data-plane access (the step everyone forgets) ----------
STORE_ID=$(az appconfig show -n $STORE -g $RG --query id -o tsv)
ME=$(az ad signed-in-user show --query id -o tsv)

az role assignment create \
  --assignee-object-id "$ME" --assignee-principal-type User \
  --role "App Configuration Data Owner" \
  --scope "$STORE_ID"
# Role assignments take a few seconds to propagate. If the next command
# returns 403, wait and retry rather than debugging it.

# --- write key-values, using your identity rather than an access key -------
az appconfig kv set -n $STORE --auth-mode login --yes \
  --key "Api:Timeout" --value "30"

az appconfig kv set -n $STORE --auth-mode login --yes \
  --key "Api:Timeout" --value "60" --label prod

az appconfig kv set -n $STORE --auth-mode login --yes \
  --key "Api:BaseUrl" --value "https://api.example.com" --label prod \
  --content-type "text/plain"

# a sentinel key — the pattern explained in Architecture
az appconfig kv set -n $STORE --auth-mode login --yes \
  --key "Sentinel" --value "1" --label prod

# --- a feature flag --------------------------------------------------------
az appconfig feature set -n $STORE --auth-mode login --yes \
  --feature Beta --label prod

az appconfig feature enable -n $STORE --auth-mode login --yes \
  --feature Beta --label prod

# --- read it back ----------------------------------------------------------
# everything, so you can see both labels side by side
az appconfig kv list -n $STORE --auth-mode login --fields key label value -o table

# what a 'prod' client would actually see: no-label defaults, then prod overrides
az appconfig kv list -n $STORE --auth-mode login --label '\0' --fields key value -o table
az appconfig kv list -n $STORE --auth-mode login --label prod  --fields key value -o table

# the feature flag as it really is — a key-value with a reserved prefix
az appconfig kv show -n $STORE --auth-mode login \
  --key ".appconfig.featureflag/Beta" --label prod
Three things in there are worth more than the rest:
--auth-mode loginmakes the CLI use your Entra identity instead of silently fetching an access key. Get in the habit; it's the only mode that works once local auth is disabled, and it's why the role assignment above was necessary.--label '\0'is how the CLI expresses "the null label". It is unintuitive, it differs from an omitted--label(which means "any label"), and it is the source of a great deal of confusion.- The feature flag is just a key-value. Reading
.appconfig.featureflag/Betadirectly is the quickest way to internalise that the Feature manager blade is a UI over the same store.
PowerShell note
There is an Az.AppConfiguration module for the control plane (creating and configuring the
store), but the data plane — key-values and feature flags — is not its strength; the az appconfig kv commands and the SDKs are the practical path. Since App Configuration's consumers are usually
applications rather than Windows administrators, this page doesn't carry a full PowerShell
translation. If your shop is PowerShell-first, use New-AzAppConfigurationStore for provisioning and
the .NET SDK or az for the data.
Path 3 — Terraform (minimal)
The smallest declarative version. The parameterised, remote-state, CI-wired version is in Deployment.
terraform {
  required_providers {
    azurerm = { source = "hashicorp/azurerm", version = "~> 4.0" }
  }
}

provider "azurerm" {
  features {}
}

data "azurerm_client_config" "current" {}

resource "azurerm_resource_group" "demo" {
  name     = "rg-appconfig-demo"
  location = "uksouth"
}

resource "azurerm_app_configuration" "demo" {
  name                = "appcs-demo01" # globally unique — change the suffix
  resource_group_name = azurerm_resource_group.demo.name
  location            = azurerm_resource_group.demo.location
  sku                 = "free"
}

# The role assignment is NOT optional. Terraform writes key-values through the
# data plane, and the identity running `apply` has no data-plane permission just
# because it created the resource.
resource "azurerm_role_assignment" "tf_data_owner" {
  scope                = azurerm_app_configuration.demo.id
  role_definition_name = "App Configuration Data Owner"
  principal_id         = data.azurerm_client_config.current.object_id
}

resource "azurerm_app_configuration_key" "timeout_default" {
  configuration_store_id = azurerm_app_configuration.demo.id
  key                    = "Api:Timeout"
  value                  = "30"

  depends_on = [azurerm_role_assignment.tf_data_owner]
}

resource "azurerm_app_configuration_key" "timeout_prod" {
  configuration_store_id = azurerm_app_configuration.demo.id
  key                    = "Api:Timeout"
  label                  = "prod"
  value                  = "60"

  depends_on = [azurerm_role_assignment.tf_data_owner]
}

resource "azurerm_app_configuration_feature" "beta" {
  configuration_store_id = azurerm_app_configuration.demo.id
  name                   = "Beta"
  label                  = "prod"
  enabled                = true

  depends_on = [azurerm_role_assignment.tf_data_owner]
}
terraform init
terraform plan
terraform applyThe depends_on blocks are the whole lesson of this snippet. Terraform can't infer that writing a
key-value requires the role assignment to exist first, because the key resource references the store,
not the assignment. Without them you get a 403 on the very first apply and a successful one on the
second — a flaky pipeline whose cause looks like a race condition and is actually a missing dependency
edge. Even with them, RBAC propagation is eventually consistent, so an occasional retry is normal;
Deployment covers the sturdier patterns (assign the role in a separate earlier
stage, or grant it to the pipeline identity once at the resource-group scope, out of band).
Read it from an application
Two keys and a flag are only interesting once something consumes them. The minimal .NET version:
dotnet new console -n AppConfigDemo && cd AppConfigDemo
dotnet add package Microsoft.Extensions.Configuration.AzureAppConfiguration
dotnet add package Azure.Identity
export APPCONFIG_ENDPOINT="https://appcs-demo01.azconfig.io"
using Azure.Identity;
using Microsoft.Extensions.Configuration;
var endpoint = Environment.GetEnvironmentVariable("APPCONFIG_ENDPOINT")!;
var config = new ConfigurationBuilder()
.AddAzureAppConfiguration(options =>
{
options.Connect(new Uri(endpoint), new DefaultAzureCredential())
.Select("*", LabelFilter.Null) // shared defaults first
.Select("*", "prod"); // prod overrides win
})
.Build();
Console.WriteLine($"Api:Timeout = {config["Api:Timeout"]}"); // 60 — prod won
Console.WriteLine($"Api:BaseUrl = {config["Api:BaseUrl"]}");dotnet runThe endpoint comes from an environment variable, not from the store — there is always exactly one
bootstrap value you cannot keep in App Configuration. DefaultAzureCredential picks up your az login session locally and a managed identity when the same code runs in Azure, which is why nothing
here holds a key. Swap the two Select calls around and watch the answer change to 30; that
one-line experiment teaches the label model better than any paragraph.
Refresh, sentinel keys, feature-flag evaluation, and Key Vault references are deliberately omitted here — they are in Architecture and Integrations.
Teardown
Cleanup note: do this now, not later. Half of all surprise cloud bills come from forgotten demo resources — and in this case a forgotten store also holds a globally unique name you might want back.
az group delete -n rg-appconfig-demo --yes --no-waitOr, if you used Terraform:
terraform destroyTwo things az group delete does not fully finish for you:
The store is soft-deleted, not gone. It keeps its globally unique name for the retention period, so recreating
appcs-demo01will fail until it's recovered or purged. On the Free tier the retention is minimal-to-absent, but get in the habit of checking:az appconfig list-deleted -o table az appconfig purge -n appcs-demo01 --yes # only if purge protection is offThe role assignment you created on yourself was scoped to the store, so it disappears with the store. Role assignments scoped above the store — at the resource group or subscription — survive and are worth auditing occasionally.
Next: Deployment →
← Back to the Azure App Configuration overview · ← Previous: Architecture